Network Boot WinPE Recovery Disk with PXElinux & Wimboot

Booting WinPE from PXE: A Comprehensive Guide
Do you find yourself needing the functionalities of the "Windows Recovery Console" for specific maintenance tasks or programs, but struggle to locate the original installation CD?
This article details how to initiate WinPE through PXE booting, eliminating the need for physical media.
Understanding Windows PE (WinPE)
Windows Pre-execution Environment, or WinPE, is commonly recognized as the minimal Windows version that typically boots from an installation disc.
Throughout the years, numerous projects have emerged aiming to provide a "Windows Live" environment, mirroring the capabilities found in many Linux distributions.
PXE Booting for WinPE
This guide will demonstrate how to configure WinPE from the installation CD to boot via PXE.
This allows for convenient access to tools like the Dell BIOS update utility without relying on a CD or USB drive.
We encourage you to delve deeper into the extensive possibilities this technique unlocks.
Benefits of PXE Booting WinPE
- Convenience: Eliminate the need to locate and use physical installation media.
- Centralized Management: Deploy and manage WinPE images across a network.
- Remote Troubleshooting: Access and repair systems remotely.
- Automation: Automate tasks like BIOS updates and system diagnostics.
By utilizing PXE booting, you gain a streamlined and efficient method for accessing the WinPE environment.
This approach offers significant advantages for system administrators and advanced users alike.
Introducing WIMBoot to FOG
Previously, we detailed PXE booting and the straightforward installation of a FOG server. Today, we'll expand FOG's capabilities by incorporating the wimboot module. The process will involve several key steps:
- Updating PXElinux to version 5.01 or a later release, if necessary.
- Integrating the wimboot module into the FOG environment.
- Transferring the Windows Installation Media (WIM) image and associated files from the Windows installation disc.
- Creating a corresponding menu entry within FOG.
- Utilizing the resulting WinPE environment to establish a functional "Windows recovery console".
This approach bypasses the complexities of the traditional Windows Automated Installation Kit (WAIK) method. WAIK often requires installation on a local machine and a complex process to convert the WIM file and its support files for use with Windows Deployment Services (WDS) or Remote Installation Services (RIS).
Advantages of this Method
While Linux-based alternatives, such as the UDA project, are available, this method offers a simpler solution. It involves a one-time file replacement on the PXE server and direct copying of the unmodified WIM file and support files from the Windows installation media.
It’s important to understand that while this setup allows you to initiate the Windows installation process, completing the installation is not within the scope of this guide.
Let's begin the configuration process.
Upgrading PXElinux to Version 5.01
Currently, the Syslinux package available within the Ubuntu repositories remains at version 4.05. This is likely due to significant alterations introduced by the Syslinux team with the V5 release. These changes encompass a new foundation for COM32 modules, now based on the ELF format, and a requirement for a library – ldlinux.c32 – for functionalities extending beyond a basic boot process.
Such modifications can potentially lead to compatibility issues for users accustomed to previous methods. However, a manual download and installation process will ensure your FOG installation remains fully functional.
We will utilize version 5.01, as it represents the most recent stable release from the V5 branch at the time of writing. This version has been specifically tested and validated in collaboration with the wimboot team.
Note: A contributing factor to the absence of the latest version in the Ubuntu repository may be limitations observed on Citrix-Xen environments. Specifically, HVM guests may be unable to proceed past the PXE menu with newer versions. Other hypervisors, including VMware, Hyper-V, and VirtualBox, alongside physical machines, generally experience no issues.
If this limitation does not apply to your setup, you may continue with the upgrade process.
To begin, acquire PXElinux version 5.01 directly from Kernel.org and extract its contents on your FOG server using the following commands:
wget https://www.kernel.org/pub/linux/utils/boot/syslinux/syslinux-5.01.tar.bz2tar xvhf syslinux-5.01.tar.bz2
Next, create a directory to house the necessary library files:
mkdir -p /tftpboot/howtogeek/libs
Copy the required library files into this newly created directory, ensuring they are accessible to clients during runtime:
cp -av syslinux-5.01/com32/lib/libcom32.c32 /tftpboot/howtogeek/libs/cp -av syslinux-5.01/com32/libutil/libutil.c32 /tftpboot/howtogeek/libs/cp -av syslinux-5.01/com32/modules/linux.c32 /tftpboot/howtogeek/libs/
Append the path to this directory to your existing "default" configuration file. This can be achieved by editing the file directly or by executing the following command:
echo "PATH howtogeek/libs" >> /tftpboot/pxelinux.cfg/default
Copy the essential ldlinux.c32 file to the root directory of your TFTP server:
cp -av syslinux-5.01/com32/elflink/ldlinux/ldlinux.c32 /tftpboot/
Finally, update the graphical engine (vesamenu.c32) to align with the new version:
cp -av syslinux-5.01/com32/menu/vesamenu.c32 /tftpboot/
With these steps completed, your PXE server is now upgraded to version 5.01. All previously functioning features, barring those affected by the aforementioned note, should continue to operate as expected.
WIMboot: A Detailed Overview
WIMboot functions as a bootloader and is an integral component of the iPXE project. The developers characterize its purpose as follows:
wimbootis a boot loader specifically designed for Windows Imaging Format (
.wim) files. It facilitates booting a Windows Preinstallation Environment (WinPE) directly from a RAM disk, optimizing memory usage by avoiding unnecessary duplication of the image.
The most recent version can be obtained from the official project website:
wget http://git.ipxe.org/releases/wimboot/wimboot-latest.zip
Should your FOG server lack the necessary tools, install the unzip utility:
aptitude install unzip
Extract the contents of the downloaded wimboot package:
unzip wimboot-latest.zip
Subsequently, transfer the wimboot module to the "libs" directory, which was established in the preceding step:
cp -va wimboot*/wimboot /tftpboot/howtogeek/libs/
With this completed, the WIMboot bootloader is now fully prepared for implementation.
Windows CD Files
A new directory must be established on the FOG server to contain the files that will be transferred. This can be accomplished using the following command:
mkdir -p /tftpboot/howtogeek/WinPE/
Insert the original Windows 7 installation CD into your CD-ROM drive. Subsequently, copy the files detailed below into the newly created directory.
\bootmgr
\boot\bcd
\boot\boot.sdi
\sources\boot.wim
The process is remarkably straightforward, and maintaining the original directory structure from the CD is not a prerequisite for successful operation.
It's important to note that for Dell BIOS updates to function correctly, utilizing a 32-bit version of Windows is often necessary.
Configuring the PXE Menu Entry
The process of establishing a PXE menu entry is initiated through modification of the “Utils” menu configuration file.
sudo vim /tftpboot/howtogeek/menus/utils.cfg
The following line should be added to this file:
label WinPEcom32 linux.c32 howtogeek/libs/wimbootAPPEND wimboot initrdfile=/howtogeek/WinPE/bootmgr,/howtogeek/WinPE/bcd,/howtogeek/WinPE/boot.sdi,/howtogeek/WinPE/boot.wim
With this addition, WindowsPE is now successfully integrated into your PXE server environment.
It's important to note that a pause during the "wim" file stage is normal. This is due to the transfer of a relatively large file – approximately 140MB – via TFTP, which requires more time than typical file transfers.
The following image provides visual confirmation of the successful boot process.
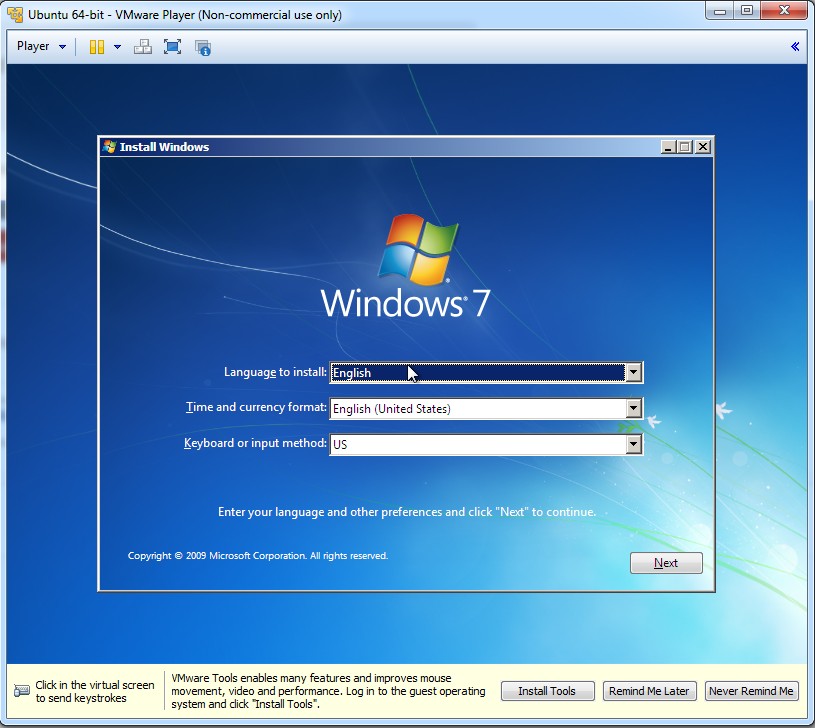
As demonstrated, a virtual machine running VMware Player, initially configured with Ubuntu, was successfully PXE booted into the WinPE environment.
Verification of the Boot Process
The successful boot into WinPE confirms the correct configuration of the PXE environment and the wimboot functionality.
Windows Recovery Console
As previously noted, attempting a full Windows installation through this method will not succeed. Enabling a complete installation is outside the parameters of this guide.
However, to illustrate its utility, we will demonstrate a Dell BIOS update using this environment.
Obtain the necessary update file from Dell’s website and transfer it to a Disk-On-Key. Insert the Disk-On-Key and initiate a PXE boot on the client machine.
To access the recovery console, select "Next" in the initial window, as shown in the accompanying screenshot.
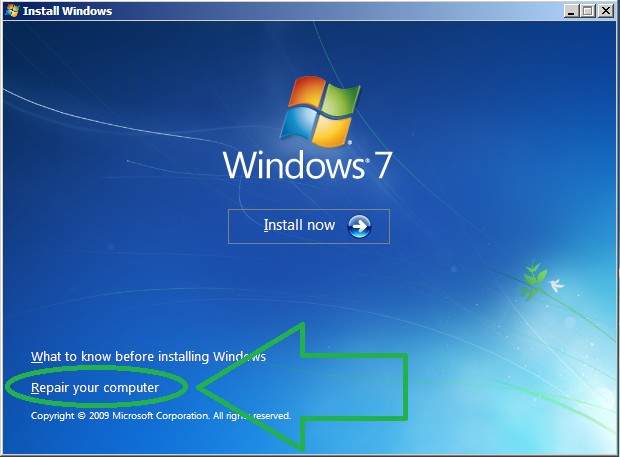
Subsequently, click the option labeled "Repair your computer".
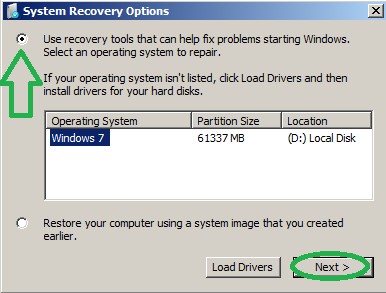
From the options presented, choose "Use recovery tools" and then click "Next".
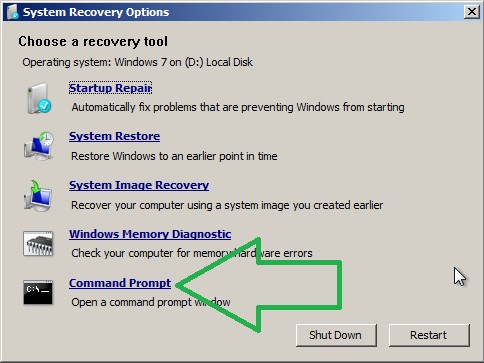
Select "Command Prompt" to open the command line interface.
Within the command prompt, determining the drive letter assigned to your Disk-on-Key by WinPE is necessary. To accomplish this, use the following command to list all currently assigned drive letters:
wmic logicaldisk get name
Excluding drive letters A: and X:, and potentially C: as well, iterate through the remaining letters. Verify the Disk-on-Key by executing:
Driveletter:dir
Upon locating the correct drive, run the update file. The result should resemble the image below:
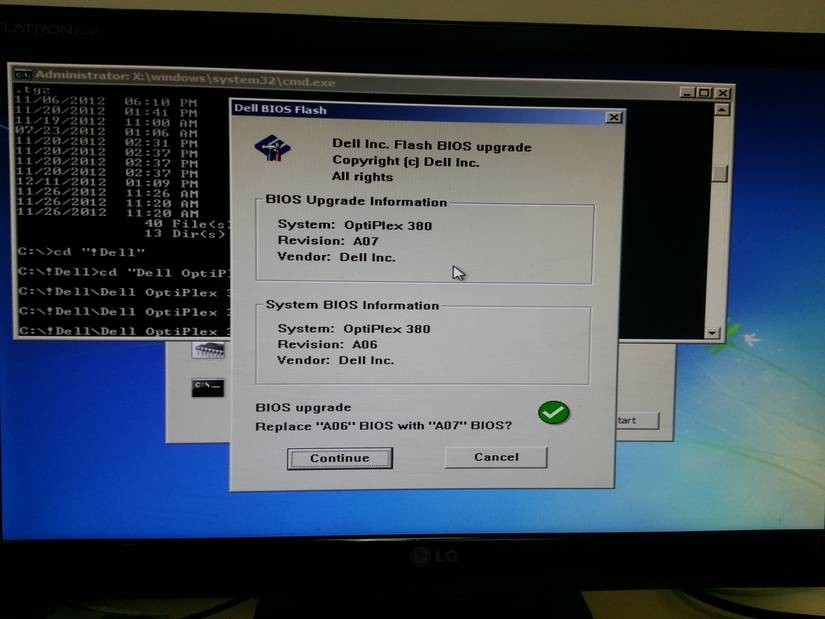
The upgrade process is now prepared to begin.
A skill set is demonstrated...