Manage Your Life with Microsoft Excel - A How-To Guide

The Power of Excel and VBA Automation
A strong affinity for Excel is widely acknowledged, and for many, this stems from the expansive capabilities unlocked by VBA (Visual Basic for Applications) scripting. Combining Excel with VBA opens up a vast landscape of possibilities for automation and data management.
Previous Excel & VBA Projects
Previously, several Excel and VBA projects have been showcased, including methods for exporting data directly into Microsoft Word. Furthermore, the ability to dispatch emails directly from within Excel has also been demonstrated.
For those less inclined towards coding, pre-built Excel applications created by others are readily available, as highlighted in previous articles.
Why Learn VBA?
However, for individuals seeking to leverage Excel for comprehensive life management, investing time in learning VBA coding is highly recommended. Understanding VBA empowers users to tailor Excel to their specific needs.
Introducing an Automation Spreadsheet
To facilitate this learning process, a dedicated "Automation" spreadsheet has been developed. This resource is designed to manage various aspects of personal organization and financial planning.
The spreadsheet is structured with four distinct tabs, encompassing functionalities ranging from launching multiple URLs simultaneously to strategically managing and accelerating debt repayment.
Exploring the Designs and Scripts
Readers are encouraged to explore the designs and accompanying simple scripts used to achieve these automation tasks. This exploration will provide practical insights into the power of Excel and VBA.
By following along, users can enhance their Excel proficiency and unlock its full potential for personal and professional use.
- VBA scripting significantly expands Excel's functionality.
- Pre-built applications offer alternatives for non-coders.
- The "Automation" spreadsheet provides a practical learning resource.
Managing Your Life With Excel
Microsoft Excel extends far beyond simple data spreadsheets; it functions as a versatile platform for building custom applications. Viewing it through this lens unlocks its potential to streamline numerous tasks and enhance productivity.
Consider each sheet as a design surface where you can strategically position Visual Basic form objects – command buttons, dropdown lists, text boxes, and more. These elements aren’t merely decorative; they enable interactive or automated data manipulation within the spreadsheet.
Monitoring Your Websites
Numerous website monitoring tools exist, such as the ICMP Ping Manager. However, a more integrated solution involves utilizing Excel VBA scripting to ping websites directly. This allows for a centralized “Automation” workbook capable of monitoring multiple sites and displaying results alongside their names.
The sheet is structured as follows:
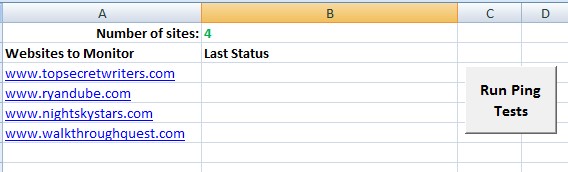
Cell B1 contains the total number of websites being monitored. The script leverages this value to iterate only through cells containing actual website addresses, starting from A3.
The VBA code responsible for this functionality is presented below:
Dim intSiteCount As Integer
Dim intCount As Integer
Dim oPing As Object, oRetStatus As Object
Dim sHost As String
Dim sPing As String
Dim intCol As Integer
Dim intRow As Integer

intSiteCount = CInt(Sheet1.Cells(1, 2).Value)
intRow = 3

For intCount = 1 To intSiteCount
 sPing = ""
 Sheet1.Cells(intRow, 2) = sPing
 intRow = intRow + 1
Next

intRow = 3
For intCount = 1 To intSiteCount
 sHost = Sheet1.Cells(intRow, 1)
 Set oPing = GetObject("winmgmts:{impersonationLevel=impersonate}").ExecQuery _
 ("select * from Win32_PingStatus where address = '" & sHost & "'")
 For Each oRetStatus In oPing
 If IsNull(oRetStatus.StatusCode) Or oRetStatus.StatusCode <> 0 Then
 sPing = "Ping Failed"
 Else
 sPing = sHost & " Ping Success on " & Now() & Chr(10)
 sPing = sPing & "Time (ms) = " & vbTab & oRetStatus.ResponseTime & Chr(10)
 sPing = sPing & "TTL (s) = " & vbTab & vbTab & oRetStatus.ResponseTimeToLive
 End If
 Next
 Sheet1.Cells(intRow, 2) = sPing
 intRow = intRow + 1
Next
Initially, the script clears previous results from the output cells. Subsequently, it iterates through the list of websites, executes the Ping command, and displays the results in column B.
The resulting sheet displays the ping status and detailed timing information:
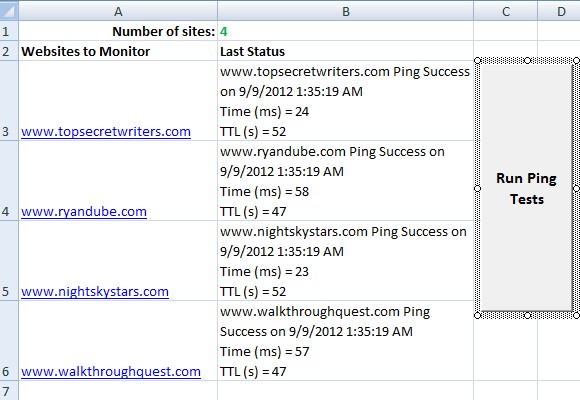
The results column clearly indicates whether each ping attempt was successful, along with response time and TTL values.
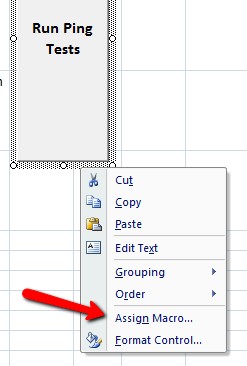
To incorporate command buttons, access the "Developer" menu, select "Insert," and choose the button option. Position the button on the sheet, right-click, and assign a macro to it.
Enter the macro name and click "New" to open the code editor.
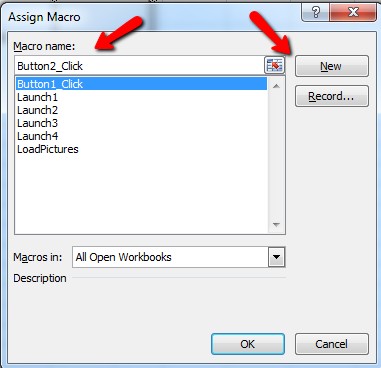
This opens the VBA editor where you can paste the code.
Maintaining a Library of Link Groups
Another useful application involves organizing frequently used links into groups. For instance, when writing for MUO, quick access to the WordPress editor, Google, and Google Docs is beneficial. Similarly, research for Top Secret Writers often requires access to specific media websites.
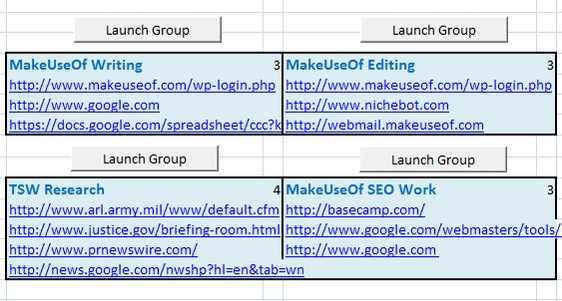
Clicking a "Launch Group" button automatically opens all links within that group in the default web browser. The script for each button functions as follows:
Dim intSiteCount As Integer
Dim intCount As Integer
Dim intCol As Integer
Dim intRow As Integer

intSiteCount = CInt(Sheet2.Cells(4, 3).Value)
intRow = 5

For intCount = 1 To intSiteCount
 ActiveWorkbook.FollowHyperlink (Sheet2.Cells(intRow, 2))
 intRow = intRow + 1
Next
This script is straightforward. The "FollowHyperlink" function opens each link listed in column B, starting from row 5. The script determines the number of links to open based on the value in cell C4. While the link count and column need to be manually adjusted for each button, the core code remains consistent.
Previewing your Picture Gallery
A third tab facilitates quick previewing of images within a designated folder. This is useful for folders containing a mix of file types, allowing for visual inspection of images.
The interface appears as follows after clicking the "Preview Pics" button:

The process involves clearing existing image entries from column B and then clicking the "Preview Pics" button.
The button executes the following script:
Dim myPict As StdPicture
Dim strFilePath As String
Dim intRow As Integer
Dim myPictName As Variant
Dim myCell As Range
Dim sPicture As String
Dim strTest As String
Dim myRng As Range
Dim intSkip As Integer

intRow = 2
strFilePath = Sheet3.Cells(1, 3).Value
Set myObject = New Scripting.FileSystemObject
Set mySource = myObject.GetFolder(strFilePath)
On Error Resume Next

With Sheet3
 Set myRng = Sheet3.Range("B2", .Cells(.Rows.Count, "B").End(xlUp))
End With

For Each myfile In mySource.Files
 If Right(myfile, 4) = ".gif" Or Right(myfile, 4) = ".jpg" Or Right(myfile, 4) = ".bmp" Or Right(myfile, 4) = ".tif" Or Right(myfile, 4) = ".png" Then
 Sheet3.Cells(intRow, 1).Value = ""
 Sheet3.Cells(intRow, 1).Value = myfile.Name
 intSkip = 0
 For Each myCell In myRng.Cells
 If intSkip = 1 Then
 With myCell.Offset((intRow - 3) + 1, 0)
 Sheet3.Shapes.AddPicture myfile.Path, msoCTrue, msoCTrue, .Left, .Top, 125, 125
 End With
 End If
 intSkip = intSkip + 1
 Next myCell
 End If
 intRow = intRow + 1
Next
This script utilizes the StdPicture object to overlay images onto cells. The position of each image is determined by the cell's coordinates. Ensure cells are slightly larger than the defined image dimensions (125x125 in this case).
Managing Your Debt
Finally, a dedicated tab provides tools for personal budgeting, originally detailed in a separate article. A key concept is leveraging Excel to visualize the “snowball effect” for debt repayment.
The method involves listing all credit card debts with their balances and minimum payments. The formula for calculating subsequent balances is: “PrevBalance + (PrevBalance * 0.10/12) - last payment”.
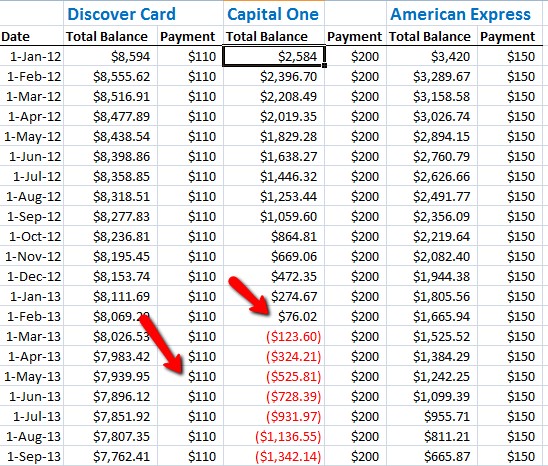
Dragging the formula down the sheet automatically recalculates balances, demonstrating the impact of payments. Paying the minimum on each debt until paid off is one strategy.
However, Excel allows for optimization. Once a debt is paid, the freed-up funds can be applied to another debt, accelerating the repayment process.
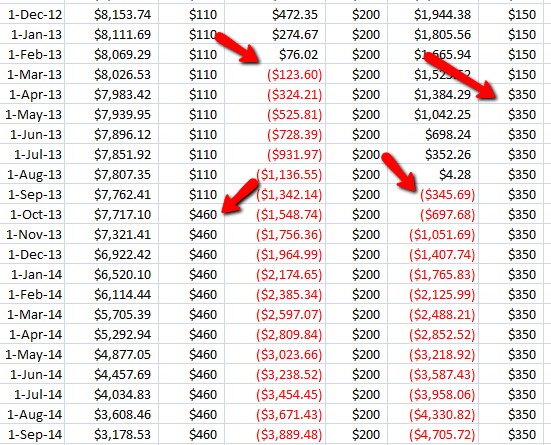
Excel’s calculating power enables quick visualization of payoff dates and provides a schedule for tracking progress.
In conclusion, Excel is a remarkably versatile tool for managing various aspects of life, from work and file organization to budgeting and debt management.
Do you utilize Excel in unique ways to manage your own life? Share your tips and insights in the comments below.
Image Credit: magnifying glass via Shutterstock